The California Beach

The California Beach

Search This Blog

Monday, 17 May 2010

Kitchen Pod

This weekend was due to be a weekend jaunt down to Devon to catch some waves and camp in the van.  However last weekend I got caught in Portugal due to the volcanic ash cloud and took a 40 hour train ride from Faro to London to get home so was sort of all travelled out.   On top of, and more importantly than, that the wave forecast was flat as a pancake so we decided to skip the journey west this weekend.    That left me with a free weekend and nothing to do.   So I took the bull by the horns and built my kitchen pod.

You might recall I had designed the pod using Google Sketchup.  I took the laptop with the software on it over to my pal Terry's house and we set it up in easy reach of our work area, on his drive.

Laptop was used for constant checking of the design.

We then unloaded the timber from the back of the van, sorting it into piles for doors, walls, lids, shelves and so on.


The timber had been pre cut to size by the local timber merchants.

The first step was to simply put the frame together.  This was built from standard 2" x 1" timber from the timber merchants, already cut to size, so all we had to do was screw it together in the frame I had already designed.


The frame took moments to put together.

The frame was in two parts, separated by the dividing wall which splits the hob section of the cabinet from the cutlery section.   Once the two halves were built we popped them into the van to see how they would look and fit.   A good start.


Nice fit.

Then all that was left to do was slap the bottoms, sides and tops on to the frame and we had a cabinet.   At least that was the theory.   But here we hit our first snag and here I learnt a valuable lesson.   All the bits of 12mm ply that the timber merchants had cut were slightly too big for the frame.   I double checked and all the plywood was exactly the right size - exactly as I had ordered.  Something had gone wrong with my design then.   As I stood there confused Terry explained my error. 

Apparently everyone calls 2" x 1" timber 'two by one', but when you come to actually buy it, the timber merchants use metric measurements and in fact these timber planks are not exactly 2" x 1", they are slightly smaller.  In fact closer to 20mm x 40mm.    This meant my frame was considerably smaller than I thought it was going to be and as such all the sides and tops and shelves were slightly too big.   Not a massive issue, it just meant we had to cut each panel to size, but when I had already paid £20 to have all this wood cut to size it was a bit annoying and it slowed us down lots.  Ultimately this was my fault for not understanding how the measurements worked in the real world.   If I ever do this sort of thing again I'll design it in mm scale and get it exactly right.    It would have saved us hours of trimming and cutting.   Still, on the plus side, at least each section was too big and none were too small!


A few hours later we had the cabinet built.

Now it was just a case of getting down to it, sawing, sanding and screwing the panels to the framework.   A few hours later we were complete and it was time to stick the doors on.  Again we had to adjust the sizes but that was no worries.

We then took a trip to B&Q where we picked up door hinges, door handles, a set of small wheels for the underside, a tea towel holder, two large handles for the sides of the cabinet - to help us to pick it up and carry it as we will be carrying it in and out of the van a lot.

By that time the day was done and it was time to go home.

On Sunday I sat in the van at home and stuck all the bits onto the cabinet.  At this stage it was starting to look like a proper cabinet.


The kitchen pod in situ.

I also cut the shelves to size (we'd run out of time to do them the day before) and fitted them, after looking through our camping gear and typical food we might like to fit into the cabinet so as to pick sensible shelf sizes.


Shelves are set to hold gas bottles and camping gear.

I drilled a hole in the section where the hob fits to allow the gas pipe to drop down into the lower section where the gas bottles are stored.  So everything is neat and tidy on the inside and all the doors can be closed up when not needed.

The gas hob fits perfectly in the top shelf.

The extra addons like the wheels and side handles were a bit of an after thought but I'm really happy with them.  Me and Mrs Blakey were able to easily lift the pod, fully laden with gas bottles and camping gear out of the van and onto the drive, where we were able to easily wheel it up to the shed and pop it into its new living place when not in the van.    This means when we want to go camping we just open the shed, wheel the pod to the van and pop it inside.   So easy.

Side handle and tea towel holder on the side.

After all that we now have what is virtually a working kitchen pod.    At B&Q we also bought a sheet of thin metal that is designed to go into the section where the gas hob lives so as to protect the wood from heat and any rogue flames.  That still needs to be cut to size and fitted into the pod.

Also due to where the pod sits in the van the lid above the hob cannot open to a vertical position - the windows start to come back in at that position, cramping its range of motion.  So the lid over the hob will overhang the gas burner ever so slightly when open.  I'm not happy about that and have to think of a solution to change this.

In addition the biggest issue still outstanding is how to attach the pod to the van when travelling.   I have some brackets in mind to do this but am going to think some more about it before I  fit it as it is a big decision and I have 2 weeks before I'm planning using the van for camping again.

I guess I also have to consider covering the pod - either with fablon like the last cabinet, or by varnishing.   This is just cosmetic however and not a high priority.

All in all I'm really pleased with a weekend's work and I am sure we could have got it done in a day if the ply wood had been cut to the right size in the first place.  A lesson learnt.

Cost to date:  £60 wood, £20 cutting service.  £70 ironmongery (hinges, handles, wheels, latches, etc), including £30 for the metal heat sheet for the hob.   Total: £150.    Total time about 15 hours work.


Monday, 26 April 2010

Kitchen Pod Being Priced Up

This weekend we really realised how much we need to get the kitchen pod sorted.  When we stopped and camped up, we got all our camping stuff out of their boxes and set our stuff up ready to cook and generally be in camping mode, but each morning we had to pack everything away into their boxes again in order to head off to the beach for some waves, and then unpack again each evening when we returned to the campsite.  It didn't take all that much time but it was quite annoying and we realised that if we were wanting to tour around - as we will do later this year when we head out on our European Tour - we'd be wasting an awful lot of time.  So we have decided to get the kitchen pod sorted as a number one priority on the van.

After about 6 iterations we finally have the design for the pod finished.   We are going for a three door design with two cupboards underneath - one with 2 doors and one with a single door.   On the top is a recessed area for our existing gas hob to drop into, with a flip top lid and opening front and next to that is an area we are planning making into a cutlery holder.   The basic design for the top of the pod was stolen shamelessly from Darran's design off the Brickyard:


Darran's Kitchen Pod being built.  This gave us the basic design for the top

The two lower cupboards will have three shelves each and each of these will be adjustable to give us as much flexibility as possible for storage.


The kitchen pod, final design, closed and opened.

After a chat to a few knowledgable people I have decided to use 12mm plywood for the panels with 2"x1" timber for the frame.  This plywood option is nice and thick and will make the whole cabinet especially robust and solid which is required as we want to be able to take it in and out when packing the van for and after a camping weekend.  Being picked up and ported about the place a lot means we need it to be sturdy.   Especially as the plan would be to carry it in and out of the van with all the camping stuff like the gas hob, gas bottles and pots and pans left inside it.

As for sticking the pod into the van I have been thrashing out all sorts of options.  Bungees, metal rods clamped into tool clips in the wall, and a split baton approach have all been considered and discussed on the BrickYard.  At the moment I'm favouring this neat little clip system suggested by Shapey off BY.  


Trouble is I'm not sure if it will actually work with a flat backed pod and a curvy van wall.   So current plan is to build the pod and then worry about securing it when I'm done.  I can always bungee it in place for travel if the worst comes to the worst.

Due to the cleverness of Google Sketchup I was able to break the design down into exactly what size of bits of wood I need very easily and today I printed them out, popped down to Lawsons with the list and asked for a quote for all the wood, cut to size. Hopefully come the end of the week I'll be able to go and pick it all up and then the actual building can start!

Bude Weekend

This weekend we took the van on a surfari to Cornwall and the town of Bude.   It's about a 5 hour drive down there and we set off after work and arrived just after 10pm.  We stayed at the Bude Holiday Park with about a dozen mates. 

The holiday park itself is big with loads of static caravans, a children's play area, an outdoor heated swimming pool (which we declined to try out) and lots of pitches with and without electrical hook ups.   They had a lot of washing and toilet facilites which were all in pretty good nick.  And they let in groups which most smaller campsites won't.  Plus they let you turn up as late as midnight and check in.   But that's where the good points end. 

The campsite was full of "interesting" people who really should have been wearing burbery, the bar was so bad that we went in there to pay for our stay up front on the Friday night and never went near it again after that, even choosing to pass on watching the Elvis impersonator who couldn't remember the words. And the security guards?  Oh my god.  Nazis.   We've finally found where all the ex-prison camp guards have been retired to.

Anyway, not letting the prison camp guards put a damper on our first night we set up camp and everyone piled into the two T5's we'd taken down for the weekend and had a few beers and talked of how the waves were going to be 3' and glassy this weekend.  Before we knew it the early morning hours were slipping away and it was decided to crash out.

Marshy, another T5 owner and surfer

Saturday dawned cold and cloudy but with no hint of wind.  It might be great down at the beach.  We all piled down there and drove into the car park.   Hmmm.  Not exactly 3'.  More like 18" on a set.  But it was clean enough and if the sun had been out it would have been lovely.   Still about half of us got in the water and had a splash about.   The others set off on a 9 mile trek along the coast path to Crackington Haven.  Some even walked there and all the way back again! 

The gang at Widemouth Beach

We stayed down at the beach all day, doing two sessions and in the afternoon the swell had picked up so we were getting maybe 2' waves on the bigger sets and still pretty clean.  Trouble was it was about 5 to 10 minutes in between sets and with the water at a chilly 9 degrees it was a long wait for each wave. 

That evening it was back to the campsite via Sainsburys and bar-b-que time.  We all huddled in the leigh of the van and made a circle to defend outselves against the prison guards.  

Bar-b-que in the evening...


Fortunately they seemed busy elsewhere in the prison camp this evening and we didn't see them.  It probably helped that the rains started to fall before midnight so everyone beat a hasty retreat and hit the sack before they realised we'd been enjoying ourselves on their watch.   Oh, but not before we'd celebrated Cecile's birthday with a few bottles of champagne and some cakes and candles!


...which became a campfire after dark

Sunday was another cold cloudy day but this time it was blowing a hooly and onshore too.  The swell had picked up to about 3' on the sets but it was very blown out.  Still, we'd come this far and even though the conditions weren't great it was still time to get in there and catch some waves.


Emil

It was a pleasure to the able to change out of my cold wet suit in the back of the van, standing up as we had the roof up, and Mrs. Blakey even greeted me with a fresh cuppa made from our new 12v kettle as I got out of the sea.  Bonus!  


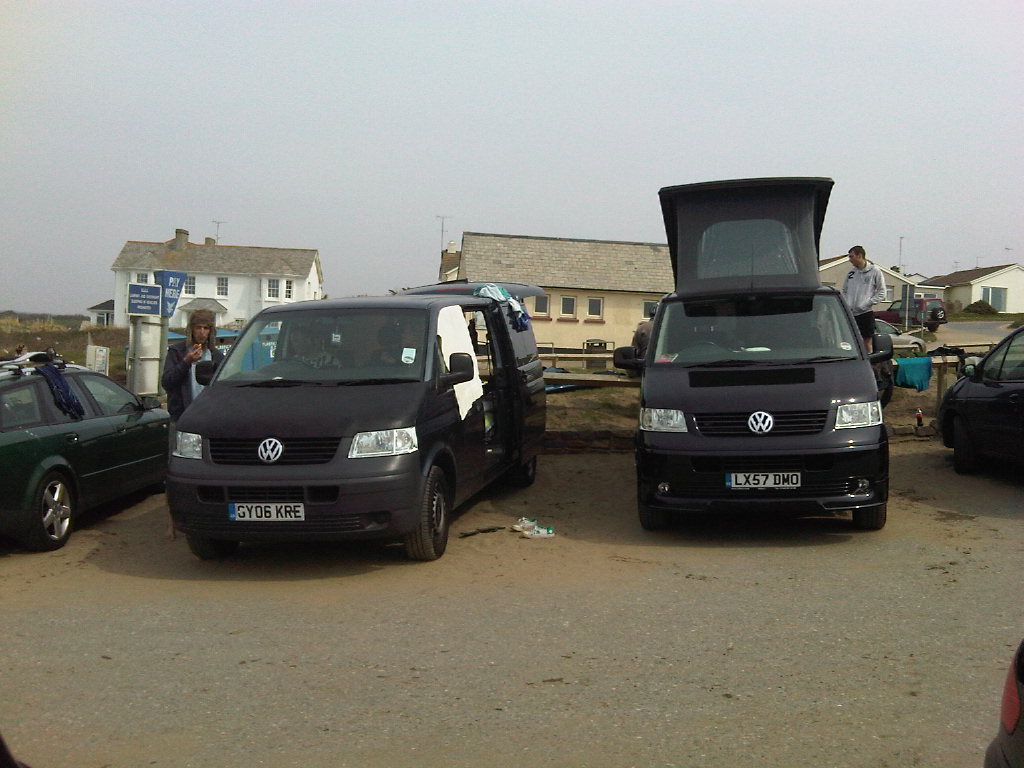
The two T5s side by side

Getting out of a sandy soaking wet suit in the back of the van did mean I left puddles of wet sand everywhere but the practical kombi floor means that a quick sweep through the next day and a damp cloth and it's sparkling like new again.  Very useful.


Local boy Glaz


After our Sunday session we said goodbye to the others and went and visited our great friends Glaz and Frances who live down near Bude and have just had a new baby.  Then we headed off home, dropping in at my sister's pub the Peter Tavy Inn on the edge of Dartmoor where my brother in law delighted in taking the micky out of this blog.   But he's clearly reading it!!!


My sister's pub on Dartmoor

From there it was a simple 4 hour cruise home down the A303 and once again I was pleased at just how easy it is to drive the van for long hours at a stretch.  Got home after 4 hours without a break feeling fresh as a daisy with none of the usual fatigue I'd feel after the same drive in a car.    I do need to invest in cruise control though - I really miss it on the long drives.

All in all a really enjoyable weekend although it would have been even better had the weather stayed as it has been all week.

Oh and as for the campsite, I'm giving them 3/10.  Probably about 6/10 for the campsite itself and -3 for the nazi guards.

Monday, 19 April 2010

One Wedding and a Rugby Match

Just back from another weekend in the van.   This time the main event was the wedding of friends of ours down in Shaftsbury, Dorset.  We packed up the van on Saturday morning with the bare necessities - it was only an overnight stay so we hardly needed anything - our table, 2 camping boxes and the cooker.


We headed off to Shaftsbury and parked up at Blackmore Vale campsite, just off the A30.  The owner was a very friendly chap who showedus to the field that serves as the campsite and told us there was no rush to be off in the morning.  Excellent.   A mere £14.50 for two of us, the van and an electrical hook up was a very good price.


We parked up and popped the roof, unpacked the camp boxes and were set up in a little over 10 minutes.  Sweet.  Only us and a caravan on the whole field and we had loads of space to ourselves.  Plus the campsite kindly provides a safari bench with each electrical hook up so we made full use of the extra table and chairs.


This weekend we'd taken a full 240v electric kettle with us and it was a good move.   Easy tea within minutes can't be overestimated!

The weather was amazing this weekend - a complete opposite to our Easter camp and it reminded me just why camping is the best way to spend a weekend when the weather is good.  And as Mrs Blakey was getting ready for the wedding we realised another advantage of a black van with limo tinted windows - a bonus mirror for straightening your hair in!


The wedding was a great event and free champagne all night and a hog roast plus barn dance was a lot of fun.   We got back in the early hours and climbed up into the loft for a comfortable night's sleep.  It was cold again - Mrs Blakey got out in the middle of the night and there was a frost on the ground and on the sides of the van - testament to the quality insulation I think.

We rated the campsite about 6/10.  It was cheap and in a pretty spot, with some heavy road noise as it was just off the A30.  The facilities were old and knackered but at least they were clean and the price was very good.  Value for money was 9/10 and it was perfect for what we wanted - a cheap over night spot - but I'd not have wanted to stay there any longer than a weekend.


Sunday we chilled out in the sunshine with a leisurely breakfast and then packed up and headed off to Bristol for a Championship play off match between Bristol vs Bedford.   Bris won and are in the semi-finals, there were 11 tries in the game and we stood roasting in the sunshine for the whole game.  


Drove home down the M4/M25/M23 and even got a big thumbs up from a passing VW van on the M25, so all in all a top weekend.

Friday, 16 April 2010

Kitchen Pod Design Continues

Me and Mrs Blakey have been thrashing out some more details and Google SketchUps of the kitchen pod we want to put in.  We went into the van and came up with a set of dimensions and then redesigned it based around those numbers.   We have decided on adding the gas hob and cutlery draw to the top section, with a hinged door on the top and front of this section, split into two parts.   Below this section the main pod will comprise three sections, each with a door and numerous shelves.  This will lead to lots of smaller compartments which will mean things won't slide about as much.  The shelves will be adjustable with lots of height options to choose from.


The Google SketchUp picture above shows the new design, with from left to right, the kitchen pod all shut up (it's usual state), with it all opened (to show the insides and shelves off) and with it in "cooking mode".

Not 100% finished yet as I'm still not 100% convinced about three sections as this precludes putting bigger items in.  Also, we need to rescale it in terms of how deep it can be, as we have a maximum depth based on our desires to put a Variotech 333 seat system in sometime and this means we can't build this out too far.

Finally, my pal Terry had an idea to build a metal rod into the back of the cabinet and have clamps screwed into the panel of the van so that the metal rod can push back into the clamps and secure it in place.  I believe they use a similar mechanism for holding kitchen furniture in place.  Great idea for letting the pod clip into place neatly and then be removed when no longer camping.  Will also mean no need for slightly messy looking bungees.

Monday, 12 April 2010

Kitchen Design

I found Google Sketch today.  Wow.  A cracking piece of free software that's really intuitive and easy to pick up.   I managed to install it, run through the simple tutorial (like all these things this is a must) and then knock up a simple first design for my kitchen pod with it all in my lunch hour.   It's that easy to use.


The design is a simple one with a rectangular cabinet with single internal shelf.  Google Sketch lets you draw things to scale so you can really design something that is going to fit.

I've cut a hole in the top shelf and hinged it.  This is where the cooker will slot. 


Not bad for an hour's work!

Sunday, 11 April 2010

Cabinet Reshuffle

This weekend I finally, totally and completely finished the rear cabinet.  Honest.   Back on the 15th January this year I first started to plan and design my rear cabinet and bit by bit I've built, adjusted, improved and tweaked the design and build till I am where I am today.  

When we last saw the cabinet it was "finished" but I still wanted to cover it with a wood effect veneer.   I'm a big fan of oak furniture and my local B&Q had some fablon in light oak which looked a good colour to me, so I snapped up a few rolls.  After reading about Darran's self built kitchen pod I realised I had to also pick up some MDF primer as apparently fablon doesn't stick to bare MDF as the wood soaks up all the glue.

So I got home this weekend and cracked straight on with priming the cabinet.   Not too difficult with suitable application of masking tape and an old curtain to shield the floor.  Only took a couple of hours including drying time.


Then it was on to the fun stuff - applying the fablon.  Mrs Blakey is a bit of a wallpaper whiz so I have to admit I let her do most of the tricky stuff. 


We did it all properly - taking all the speakers out, the coat hooks off, and the power sockets unscrewed so we could get all the fablon underneath all these bits.


This fablon covering means that the cabinet now looks more like a real wood box than a plywood box, plus it covers up all the screw heads that were showing, and on the sides where we had two pieces of ply and a miniture gap between them it now looks like one consistent bit of wood.   I'm really pleased with the final results.


So is Mrs Blakey.

Whilst I was there I took the chance to reshuffle the interior of the cabinet as well.   I took the mains charger out of its spot in the top cabinet and moved it into the bottom section where I bungeed it in place against the wheel arch.  It's not neat in there particularly but it is out of the way and stored with all the other electricals.  Additionally we can now easily read the charge reading on the battery and have easy access to the on/off switch.    Also into the lower cabinet I moved the AC/DC transformer we picked up.  This means we can now run the 12v fridge off this 240 power source when parked up on a mains hook up or run it off the 12v battery when we have no such luxury.


Moving the charger 'downstairs' freed up a space that was begging for use so I have put the 12v kettle and tea/coffee stuff in there for now.  


Whilst I was at it I got some fablon sticky shelf stuff and added it to the removable shelf. Oh and I also cut the shelf out of MDF to replace the plywood version we had in there earlier - simply to make it a little more strong.


All in all I am chuffed to pieces with the cabinet.  It looks good, does all the things I wanted it to when I first designed it, and its all built and designed by me (with a little help from my friends!).  Very pleased!